

")


Do It Yourself?
This past weekend, my wife and I decided to take on a few home improvement projects ourselves.
Seeing how the siding contractors have gone around obstacles on the side of the house they’ve finished, it seemed like a good idea to remove and replace the obstacles we don’t really like, so when they go around them, they’re not leaving an eyesore up there.
The back porch area was the area we concentrated on — specifically the light fixture and the dryer vent.
The first project of the day would be the dryer vent. When I bought the house in 2002, there wasn’t a dryer — just a 3 inch vent, with a bird nest, for one to hook up to. When I finally purchased a washer and dryer, my mom cried as I’d no longer make laundry visits. But the real problem I had was that the standard dryer duct was 4 inches — I had a 3 inch vent. Nothing an adaptor couldn’t take care of, but it was always something in the back of my mind; make the dryer vent bigger.
The original wall mounted light fixture on the porch was one of those junky looking under-$10 types. We went to our local Home Depot (we’re actually more partial to Lowe’s, but it’s farther away) and picked out a relatively inexpensive (around $40) motion sensor type of fixture.
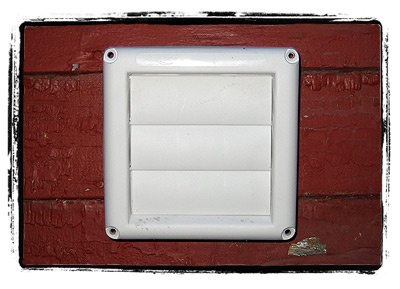
Then we headed to the aisle with the dryer vents. We picked up a nice plastic one that came with the 4-inch duct that would extend into the house. There were all kinds of options to pick and choose from individually (duct & vents), but this one had everything connected already and kinda had the look I was picturing. Total damage, about $5.
Now the problem would be drilling a 4-inch hole in the side of the house. I knew my dad had drill bits like that, and I remembered exactly where he kept them. Problem is, my parents retired to Florida a few years ago, so I’d have to get one for myself.
Off to the tool section and I couldn’t find what I was looking for. They had what was called a 4-inch saw bit. Not really what I needed. My wife asked one of the associates and they said we needed that and a mandrell. Hmmm… Barbara Mandrell is going to help me drill the hole, eh?
Nope, it was a mandril. Basically a normal looking drill bit with the ability to attach the 4 inch saw blade to. Never saw one of those before. I thought a mandril was a monkey. My dad’s big circle bits always one big piece. Whatever, we needed it to make the hole and this was all they had. Sucks that it was nearly $40 total for both pieces. I’m not sure I can think of another place I’ll need to drill a 4-inch hole. Ever.
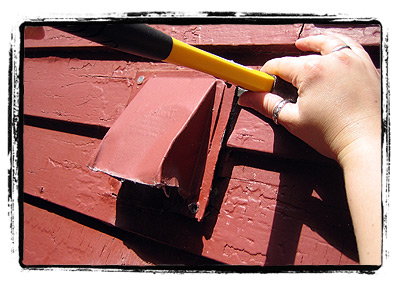
Once home, the dryer vent was the first project. My wife used a hammer to pry off the old vent. One thing I’ve noticed on this house is that the previous owners had apparently never heard of a screw. Everything is nailed on. And then painted over. Once she got the vent off, we saw what I’d guess was the original colour of the house: white.Â
 Â
 From the insides of the attic windows, we determined long ago that the trim was originally green. White with green trim and brown cedar shingles. That would have looked really nice. Makes you wonder why they threw light gray shingles on top, painted the whole thing a baked bean shade of red, and then nailed plastic black shutters up.
Back to the task at hand… Since it would be too difficult to use the drill to make the 3-inch hole a 4-inch hole without drifting, and the original hole was in an odd place anyway, we decided to make it a few feet lower and to the left. We picked out spot and I started to drill.
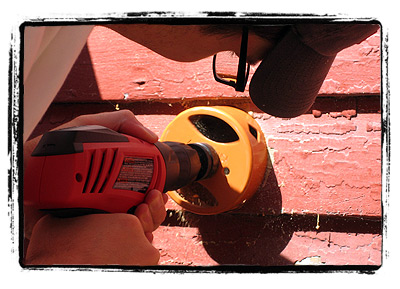
Barely through the semi-rotten clapboard, it became apparent that an electric drill would be a huge advantage over the cheap Skil 12V battery powered drill I have. It’s a terrible drill. In fact, I hesitate to even call it a drill. Screw stripper would be a more accurate name. It died.
We recharged it and drilled to death about 5 or six times before we’d gone through the siding, the wood behind the siding, the wood lathe, and the interior plaster wall. We luckly missed a stud by about an inch — something I hadn’t even thought of when I started to drill, but something I won’t forget for the next time I’m pulling holes somewhere in the house.
I was also surprised at how thick and hard the wood was, once through the old siding. I was always a little skeptical about how solid the house was where it looks terrible, but just behind one of the worst places on the exterior, it’s as solid as solid can be.
We pushed the new duct and vent through the hole, connected the dryer and gave it a test run. Success! I didn’t bother to pull/push it flush against the house and screw it down yet though, as I’m sure the contractors will appreciate it having a little give for when they side around it.
 Next up was the light fixture. We turned off the power and pulled down the old one. I was worried it was going to be like some of the interior wiring — ancient. It was old, but not terrible. The biggest problem we had was stuffing all of the connections in behind the fixture. And then figuring out which setting to set the motion sensor on. We also left a little give on it too — it’s not super tight against the house either for the contractor’s benefit.
Small projects, yeah, but we’re working our way up to tearing off the horrible wood paneling, and then plaster, in our entry room. Small steps, right?


")


